> ## Documentation Index
> Fetch the complete documentation index at: https://docs.sequence.xyz/llms.txt
> Use this file to discover all available pages before exploring further.

# AIミント付きトレジャーチェスト

> Reactを使って、AI生成の戦利品が手に入るトレジャーチェストのweb3アプリの作り方を解説します。認証にはEmbedded Wallet、トランザクション処理を簡単にするためにCloudflare Worker、Sequence Stackのツールを活用します。

所要時間：約50分～60分

このガイドでは、[React](https://react.dev/)で構築したweb3アプリを作成します。Sequence Stackのツールを使い、Embedded Walletによる認証とCloudflare Workerによる簡単・確認不要のトランザクションで、AI生成の戦利品をトレジャーチェストからミントします。

これらの機能をご体験いただけるよう、[ダンジョンクローラーゲーム](https://0xsequence-demos.github.io/demo-dungeon-minter/)としてまとめました。実際にプレイして報酬を獲得できます。

<Note>
  全コードは以下のリポジトリで公開しています：

  * [Web3 Reactダンジョンクローラーゲーム](https://github.com/0xsequence-demos/demo-dungeon-minter)
  * [テンプレートEmbedded Wallet](https://github.com/0xsequence-demos/template-embedded-wallet-web2-auth)
  * [Cloudflare Worker](https://github.com/0xsequence-demos/demo-cloudflare-worker-treasure-chests/)
  * [Diablo Loot API](https://github.com/0xsequence-demos/integration-diablo-loot-api)
</Note>

これらのツールで以下のことが可能になります：

1. [Sequence Builderコンソール登録＆プロジェクト作成](/guides/treasure-chest-guide#1-sequence-builder-console-signup-and-project-creation)：Builderでプロジェクトを作成
2. [アクセスキー管理](/guides/treasure-chest-guide#2-access-key-management)：Sequence Stackとやり取りするためのパブリックキー、シークレットキー、waas configキーを取得
3. [Embedded Wallet統合](/guides/treasure-chest-guide#3-embedded-wallet-integration)：アプリケーションにEmbedded Walletを組み込む
4. [コントラクトのデプロイ＆ガススポンサー](/guides/treasure-chest-guide#4-deploy-a-contract-and-sponsor-gas)：アイテムコントラクトをデプロイし、ガスをスポンサーする
5. [Cloudflare Worker をデプロイする](/guides/treasure-chest-guide#5-deploy-transactions-api-on-a-cloudflare-worker)：ガスレスかつ確認不要なトランザクションのために Cloudflare Worker をデプロイします
6. [AIプロンプトと画像の生成](/guides/treasure-chest-guide#6-generating-ai-prompts-and-images)：API経由でAIプロンプトを作成し、画像を生成してアップロードします
7. [メディアを Sequence Metadata サービスに保存](/guides/treasure-chest-guide#7-store-media-to-sequence-metadata-service)：コレクションやトークンのメタデータを Sequence にアップロードします
8. [Cloudflare Worker のセキュリティ強化](/guides/treasure-chest-guide#8-minting-with-your-cloudflare-worker)：外部からのリクエストを防ぐためにリファラーURLを制限します
9. [(オプション) 各ウォレットごとのネイティブミント制限](/guides/treasure-chest-guide#9-optional-native-mint-restriction-per-wallet)：ウォレットごとの1日あたりのミント数を制限します

## 1. Sequence Builder コンソールへのサインアップとプロジェクト作成

まずは[こちらの手順](/solutions/builder/project-management)に従い、[Sequence Builder Console](https://sequence.build/)へのサインアップ方法とプロジェクトの作成方法を確認してください。

`Gas Sponsoring` や `Transactions API` など一部機能を利用するには、[こちらの手順](/solutions/builder/project-settings#5-billing-settings)に従ってプロジェクトプランを `Developer` にアップグレードする必要があります。

## 2. アクセスキーの管理

プロジェクトが作成できたら、Sequence Stack でアプリケーションを認証するために3種類のアクセスキーを取得する必要があります。
・`Waas Config Key`：Embedded Wallet 用。詳細は[こちら](/solutions/builder/embedded-wallet)をご覧ください。
・`Public Access Key`：Embedded Wallet および Transactions API 用。取得方法は[こちら](/solutions/builder/getting-started#claim-an-api-access-key)をご参照ください。
・`Secret Access Key`：Metadata Service 用。以下の手順で取得します。

1. `Waas Config Key`：Embedded Wallet 用。詳細は[こちら](/solutions/builder/embedded-wallet)をご覧ください。
2. `Public Access Key`：Embedded Wallet および Transactions API 用。取得方法は[こちら](/solutions/builder/getting-started#claim-an-api-access-key)をご参照ください。
3. `Secret Access Key`：Metadata Service 用。以下の手順で取得します。

### シークレットアクセスキーの作成

<Steps>
  <Step title="設定画面を開く">
    まず設定画面にアクセスし、API Keys を選択します。

    <Frame>
      <img src="https://mintcdn.com/sequence-0fb8d9e6/IZqleG3FrRJUGG_y/images/builder/builder_settings_access_keys.png?fit=max&auto=format&n=IZqleG3FrRJUGG_y&q=85&s=ab7ca20b281694cc765e8423e0fc1c22" alt="builder settings access keys" width="1757" height="771" data-path="images/builder/builder_settings_access_keys.png" />
    </Frame>
  </Step>

  <Step title="サービスアカウントの追加">
    下にスクロールして`+ Add Service Account`を選択します。

    <Frame>
      <img src="https://mintcdn.com/sequence-0fb8d9e6/IZqleG3FrRJUGG_y/images/builder/builder_settings_add_service_account.png?fit=max&auto=format&n=IZqleG3FrRJUGG_y&q=85&s=6aa943be04546a4094d7c607886a2b02" alt="builder settings add service account" width="2033" height="805" data-path="images/builder/builder_settings_add_service_account.png" />
    </Frame>
  </Step>

  <Step title="書き込み権限の選択">
    アクセス権限を `Write` と `Confirm` に変更します。

    <Frame>
      <img src="https://mintcdn.com/sequence-0fb8d9e6/IZqleG3FrRJUGG_y/images/builder/builder_settings_add_service_account_confirm.png?fit=max&auto=format&n=IZqleG3FrRJUGG_y&q=85&s=8a68a2c6916f2fffbdec33d32e24b2de" alt="builder settings add service account" width="2033" height="771" data-path="images/builder/builder_settings_add_service_account_confirm.png" />
    </Frame>

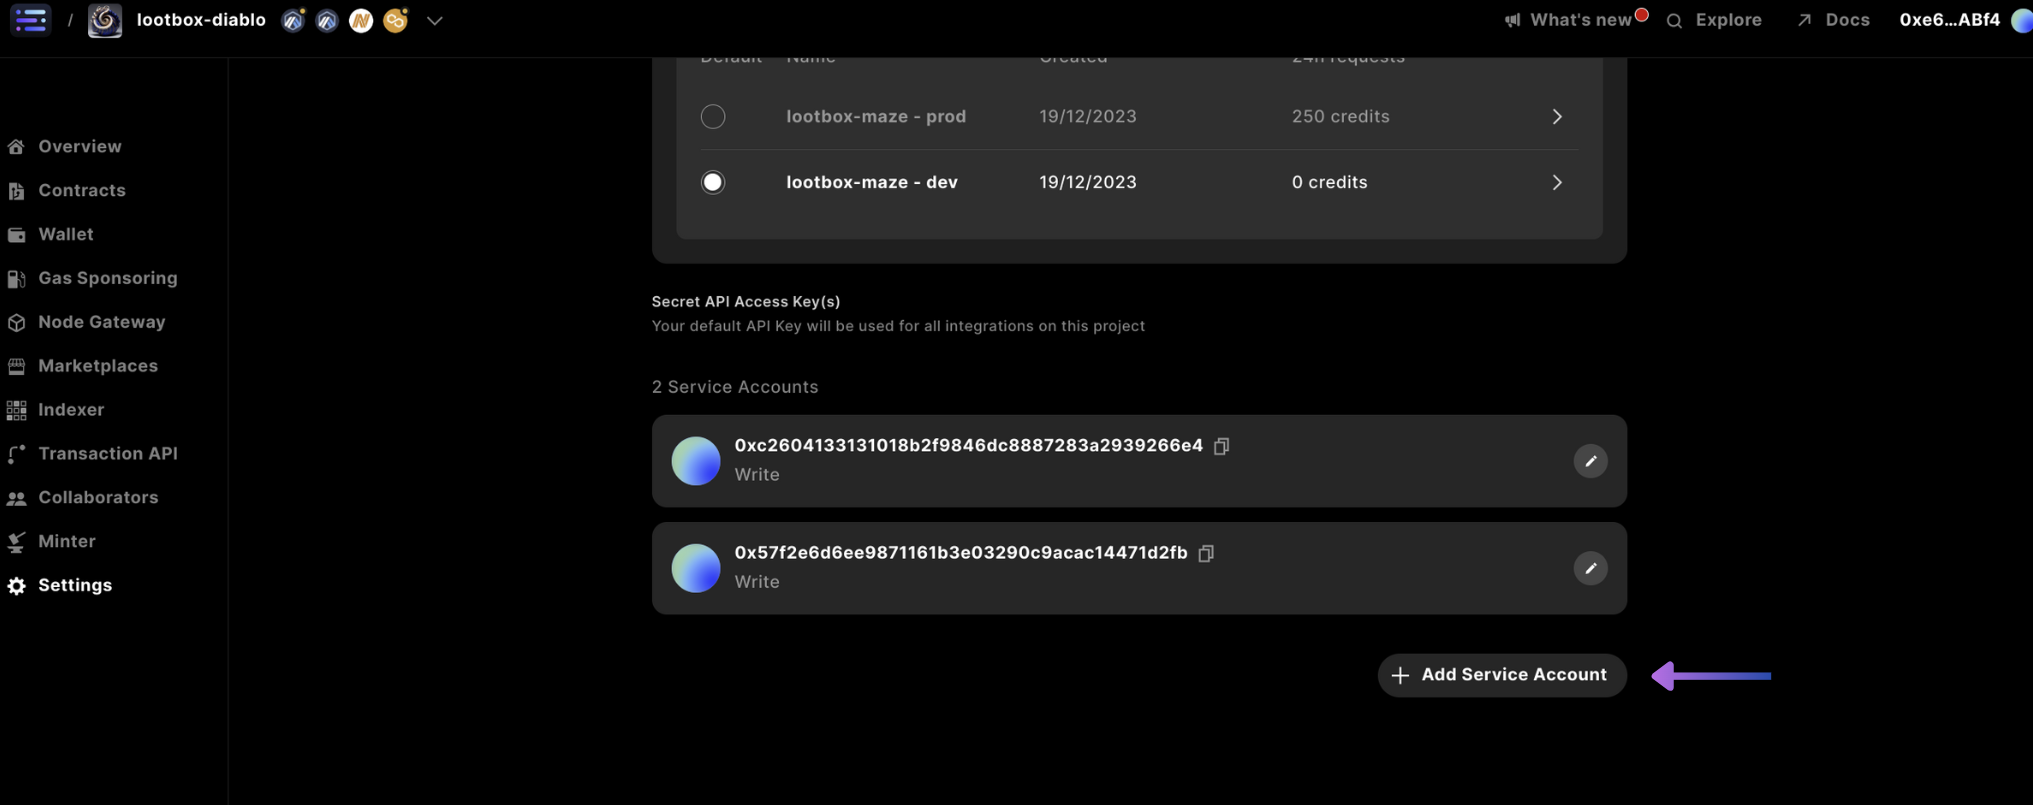
    最後に `copy` をクリックし、キーを安全な場所に保管してください。なお、Builder Console からは今後再確認できません。
  </Step>
</Steps>

## 3. Embedded Wallet の統合

<Note>
  テンプレートリポジトリは[こちら](https://github.com/0xsequence-demos/template-embedded-wallet-web2-auth)から閲覧やクローンができます。
</Note>

ここでは、必要な要素をゼロから構築して、ユーザーがWeb2認証プロバイダーを使ってアプリケーションにオンボードできる Sequence Embedded Wallet の利用を可能にします。

まず `mkdir <project>` でプロジェクトフォルダを作成し、`cd <project>` で移動後、React を使って `vite` プロジェクトを作成します：

```shell theme={null}
pnpm create vite

# or 
yarn create vite

# or 
npm create vite
```

次に、Embedded Wallet を利用するための Wallet-as-a-Service (Waas) パッケージをインストールします：

```shell theme={null}
pnpm install @0xsequence/waas

# or
npm install @0xsequence/waas

# or
yarn add @0xsequence/waas
```

以降の手順で新規作成するファイルはすべて `/src` ディレクトリ内に作成してください。

まず `SequenceEmbeddedWallet.ts` などの名前でファイルを作成し、以下の初期化コードを記述します：

```typescript theme={null}
import { SequenceWaaS } from '@0xsequence/waas'

const sequence = new SequenceWaaS({
    projectAccessKey: import.meta.env.VITE_PROJECT_ACCESS_KEY!,
    waasConfigKey:  import.meta.env.VITE_WAAS_CONFIG_KEY!,
    network: 'arbitrum-nova'
})

export default sequence;
```

続いて、ユーザーごとに一意なセッションハッシュをSDKから生成する `useSessionHash.ts` ファイルを作成します：

```typescript theme={null}
import sequence from './SequenceEmbeddedWallet.ts'
import { useEffect, useState } from "react";

export function useSessionHash() {
    const [sessionHash, setSessionHash] = useState("")
    const [error, setError] = useState<any>(undefined)

    useEffect(() => {
        const handler = async () => {
            try {
                setSessionHash(await sequence.getSessionHash())
            } catch (error) {
                console.error(error)
                setError(error)
            }
        }
        handler()
        return sequence.onSessionStateChanged(handler)
    }, [setSessionHash, setError])

    return {
        sessionHash,
        error,
        loading: !!sessionHash,
    }
}
```

Google認証を実装するには、アプリケーション全体を `GoogleOAuthProvider` でラップする必要があります。以下のコマンドで、後ほど利用する Apple Auth サインインも含めてインストールします：

```shell theme={null}
pnpm i @react-oauth/google react-apple-signin-auth
```

その後、`main.tsx` ファイル内で先ほどインポートしたファイルを使い、スターターコードを実装します：

```typescript theme={null}
import React from 'react'
import ReactDOM from 'react-dom/client'
import './index.css'
import App from './App.tsx'
import { useSessionHash } from "./useSessionHash.ts";

import { ThemeProvider } from '@0xsequence/design-system'
import { GoogleOAuthProvider } from '@react-oauth/google'


function Dapp() {
  const { sessionHash } = useSessionHash()

  return (
	<GoogleOAuthProvider clientId="<GOOGLE_CLIENT_ID>" nonce={sessionHash} key={sessionHash}>
		<App />
	</GoogleOAuthProvider>
  );
}

ReactDOM.createRoot(document.getElementById('root')!).render(
  <React.StrictMode>
    <Dapp />
  </React.StrictMode>
)
```

`main.tsx` の準備ができたら、次はログインボタンを作成します。見た目は以下のようになります：

<Frame>
  <img src="https://mintcdn.com/sequence-0fb8d9e6/Wpr3jlEJhh_VDIM-/images/guides/treasure-chest/guide_treasure_chest_embedded_wallet_template.png?fit=max&auto=format&n=Wpr3jlEJhh_VDIM-&q=85&s=329b6c75d6e50f2275a4c38d557e0225" alt="embedded wallet social login" width="1955" height="733" data-path="images/guides/treasure-chest/guide_treasure_chest_embedded_wallet_template.png" />
</Frame>

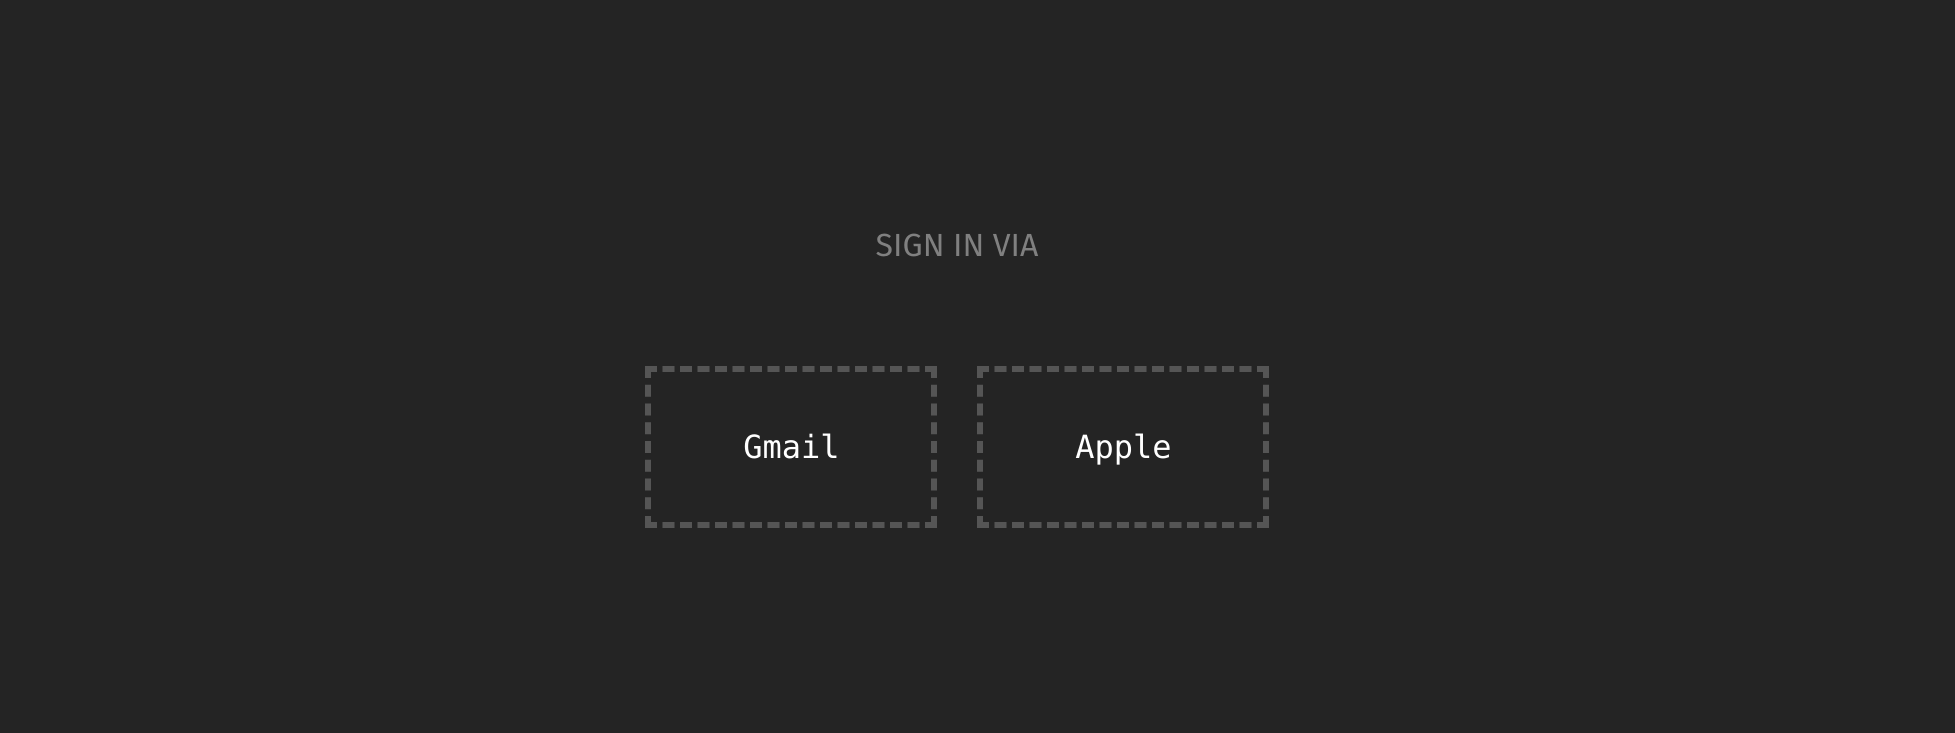
`App.tsx` では、ユーザーが接続されているかを確認し、サインインしたユーザーに基づいてウォレットアドレスを表示するコードと、各種ソーシャル認証ボタンやハンドラーを実装します：

```typescript theme={null}
import { useState, useEffect } from 'react'
import './App.css'
import sequence from './SequenceEmbeddedWallet'
import { useSessionHash } from './useSessionHash'
import { CredentialResponse, GoogleLogin } from '@react-oauth/google';
import AppleSignin from 'react-apple-signin-auth';
import playImage from './assets/play.svg'

function LoginScreen () {
  const { sessionHash } = useSessionHash()

  const [wallet, setWallet] = useState<any>(null)

  const handleGoogleLogin = async (tokenResponse: CredentialResponse) => {
    const res = await sequence.signIn({
      idToken: tokenResponse.credential! // inputted id credential from google
    }, "template")
    setWallet(res.wallet)
  }

  const handleAppleLogin = async (response: any) => {
    const res = await sequence.signIn({
      idToken: response.authorization.id_token! // inputted id token from apple
    }, "template")
 
    setWallet(res.wallet)
  }

  // checks to see if there is a logged in user
  useEffect(() => {
    setTimeout(async () => {
      if(await sequence.isSignedIn()){
        setWallet(await sequence.getAddress())
      }
    }, 0)
  }, [])

  useEffect(() => {

  }, [wallet])

  const signOut = async () => {
    try {
      const sessions = await sequence.listSessions()

      for(let i = 0; i < sessions.length; i++){
        await sequence.dropSession({ sessionId: sessions[i].id })
      }
    }catch(err){
      console.log(err)
    }
  }

  return (
    <>
      {
        !wallet 
      ? 
        <>
          <span className='sign-in-via'>SIGN IN VIA</span>
          <br/>
          <br/>
          <br/>
          <div className="login-container">
          <div className='dashed-box-google'>
              <p className='content'>
                <div className='gmail-login' style={{overflow: 'hidden', opacity: '0', width: '90px', position: 'absolute', zIndex: 1, height: '100px'}}>
                  <GoogleLogin 
                    nonce={sessionHash}
                    key={sessionHash}
                    onSuccess={handleGoogleLogin} shape="circle" width={230} />
                  </div>
                  <span className='gmail-login'>Gmail</span>
              </p>
          </div>
          <div className='dashed-box-apple'>
            <p className='content' 
            style={{position:'relative'}}>
                <span className='apple-login'>
                  {/* @ts-ignore */}
                  <AppleSignin
                    key={sessionHash}
                    authOptions={{
                      clientId: '<replce with com. bundle id>',
                      scope: 'openid email',
                      redirectURI: '<must be a deployed URL>',
                      usePopup: true,
                      nonce: sessionHash
                    }}
                    onError={(error: any) => console.error(error)}
                    onSuccess={handleAppleLogin}
                  />Apple
                </span>
            </p>
            </div>
          </div>
        </>
      : 
        <>
          <div className="login-container">
          <p style={{cursor: 'pointer'}} onClick={() =>signOut()}>sign out</p>
          &nbsp;&nbsp;&nbsp;
          <span >{wallet}</span>
          </div>
        </>
      }
    </>
  )
}

function App() {
  return (
    <LoginScreen/>
  )
}

export default App
```

続いて、プロジェクトのルートに `.env` ファイルを作成し、`.gitignore` に追加したうえで、Sequence Builder から取得した以下の値でファイルを更新します：

```
VITE_PROJECT_ACCESS_KEY=
VITE_WAAS_CONFIG_KEY=
```

<Warning>
  Vite アプリケーションの環境変数として認識されるには、すべて `VITE_` で始める必要があります。
</Warning>

ルートフォルダで以下のコマンドを実行し、動作を確認してください：

```shell theme={null}
pnpm run dev
```

## 4. コントラクトのデプロイとガススポンサー設定

AI生成画像を任意のトークンのメタデータに紐付けるため、トークンコントラクトをデプロイします。コントラクトのデプロイには `ERC1155` の利用を推奨します。`ERC721` よりも `ERC1155` を使う利点については以下で説明します。

* セミファンジブル：同じアイテムの複数コピーを持つゲーム資産などに最適です。
* ガスコスト削減：複数のトークンが必要なプロジェクトでは、1つのERC1155で多様なトークンタイプを管理できます。

ガスコスト削減の観点では、トークンタイプごとに新規コントラクトをデプロイする代わりに、1つのERC1155コントラクトでシステム全体の状態を保持できるため、デプロイコストや複雑さを抑えられます。

コントラクトをデプロイするには、[このガイド](/solutions/builder/contracts/deploy-an-item-collection)に従ってERC1155をデプロイし、`wrangler.toml`に`CONTRACT_ADDRESS`を設定してください。

ミント機能をプログラムで実行し、リレイヤーのトランザクションをガスレスにするには、アップグレードした請求プランのアカウントクレジットから Transactions API が利用できるよう、デプロイしたスマートコントラクトアドレスをスポンサー登録する必要があります。

Transactions APIで手数料なしにトランザクションを中継できるようにするには、[このガイド](/solutions/builder/gas-sponsorship#watch-gas-sponsorship-in-action-in-builder)に従って、デプロイ済みコントラクトのガススポンサー設定を行ってください。

<Note>
  すべての Sequence テストネットは無料です。
</Note>

## 5. Cloudflare Worker で Transactions API をデプロイ

前のステップに続き、Sequence Transactions API をサーバーレスな Cloudflare Worker 上で実装することで、ゲームやアプリのユーザー操作時に確認署名やガス支払いなしでシームレスに処理できます。この場合、Worker は Sequence Transactions API を利用してユーザーアドレスへトークンをミントします。トランザクション速度やスループット、リオーグなどを気にせず、Cloudflare による自動スケーリングの恩恵も受けられます。

### トークンのミント

Cloudflare Worker をゼロからデプロイする方法が必要な場合は、[こちらのガイド](/guides/mint-collectibles-serverless)でデプロイ済み `ERC1155` コントラクトを使ったサーバーレスNFTミントサービスの構築方法を確認するか、本ガイド専用の[テンプレート](https://github.com/0xsequence-demos/demo-cloudflare-worker-treasure-chests/)をクローンしてください。

<Warning>
  Sequence Standard ERC1155 Items Contract を利用する場合は、リレイヤーアカウントアドレスに `MINTER_ROLE` を付与してください。
</Warning>

セットアップが完了したら、後のステップでNFTをミントするために、Cloudflareインスタンスのエンドポイントを呼び出します。

## 6. AIプロンプトと画像の生成

AI画像生成を始めるには、メディアを作成するためのAIモデルプロンプトが必要です。本ガイドおよびデモでは、[Diabloゲーム](https://d07riv.github.io/diabloweb/)内のアイテムからプロンプトを取得しています。

[テンプレート](https://github.com/0xsequence-demos/demo-cloudflare-worker-treasure-chests/)には、すでにデプロイ済みAPIを呼び出すコードとレスポンスを解析するコードが含まれています。

このAPIを使い、Cloudflare Worker 内の `generate` 関数でデプロイ済み Diablo API のプロンプトを利用して画像を生成する方法を紹介します：

```typescript theme={null}
const generate = async () => {
	const url = 'https://flask-production-2641.up.railway.app/'; // External API endpoint
	
	const init = {
		method: 'GET',
		headers: {
		'Content-Type': 'application/json',
		},
	};

	const response = await fetch(url, init); // Fetch data from external API
	const data: any= await response.json(); 
	const defend = Math.random() >= 0.5 ? true : false
	const attributes = []
	// parse the data to create the attributes
	
	return {loot: data[defend ? 'armor' : 'weapon'], attributes: attributes}
}
```

次に、Scenario API からインスタンス化された推論リファレンスを取得し、生成した戦利品の `name` と `type` を含む `prompt`、および追加のモデルパラメータ（[Scenario API ドキュメント](https://docs.scenario.com/reference/postmodelsinferencesbymodelid)でカスタマイズ可能）を渡す `getInferenceWithItem` 関数を完成させます：

<Note>
  本ガイドでは、品質と時間のバランスから Scenario API の `EulerDiscreteScheduler` スケジューラータイプを採用していますが、他のスケジューラーも試したい場合は[こちらのカスタムローカルCLI](https://github.com/moskalyk/scenario-gg-benchmark-cli)を利用し、[Scenario.gg](https://scenario.gg/) ダッシュボードで結果を確認できます。
</Note>

```typescript theme={null}
const getInferenceWithItem = async (env: Env, prompt: any) => {
	try {
		const res: any = await fetch(`https://api.cloud.scenario.com/v1/models/${env.SCENARIO_MODEL_ID}/inferences`, {
			method: 'POST',
			headers: {
				'Authorization': `Basic ${env.SCENARIO_API_KEY}`,
				'accept': 'application/json',
				'content-type': 'application/json'
			},
			body: JSON.stringify({
						"parameters": {
						"numSamples": 1,
						"qualityBoostScale": 4,
						"qualityBoost": false,
						"type": "txt2img",
						"disableMerging": false,
						"hideResults": false,
						"referenceAdain": false,
						"intermediateImages": false,
						"scheduler": 'EulerDiscreteScheduler',
						"referenceAttn": false,
						"prompt": prompt + ' single object on black background no people'
					}
				})
		})

		const data = await res.json()
		console.log(data)
		return {inferenceId: data.inference.id}
	}catch(err){
		console.log(err)
		return {inferenceId: null, err: "ERROR"}
	}
}
```

その後、上記の関数をReactコード内で実装します：

```js theme={null}
	...
	if(mint){
		...
	} else {
		const loot = await generate()
		const inferenceId = await getInferenceWithItem(env, loot.loot.name + " " + loot.loot.type)
		...
	}
	...
```

`inferenceId` を取得したら、推論ステータスをポーリングし、`succeeded` ステータスになった時点で完了として返します。

```typescript theme={null}
const getInferenceObjectWithPolling = async (env: Env, id: any) => {
	console.log('getting inference status for: ', id.inferenceId)
	const inferenceId = id.inferenceId

	const headers = {
		'Authorization': `Basic ${env.SCENARIO_API_KEY}`,
		'accept': 'application/json',
		'content-type': 'application/json'
	}

	// Function to poll the inference status
	const pollInferenceStatus = async () => {
		let status = '';
		let inferenceData: any = null;
		while (!['succeeded', 'failed'].includes(status)) {
			// Fetch the inference details
			try {
				const inferenceResponse = await fetch(`https://api.cloud.scenario.com/v1/models/${env.SCENARIO_MODEL_ID}/inferences/${inferenceId}`, {
					method: 'GET',
					headers
				})
				if (inferenceResponse.ok) {
					console.log(inferenceResponse.statusText)
					inferenceData = await inferenceResponse.json();
				}
			}catch(err){
				console.log(err)
			}
			status = inferenceData.inference.status;
			console.log(`Inference status: ${status}`);

			// Wait for a certain interval before polling again
			await new Promise(resolve => setTimeout(resolve, 5000)); // Polling every 5 seconds
		}
		// Handle the final status
		if (status === 'succeeded') {
			console.log('Inference succeeded!');
			console.log(inferenceData); // Print inference data
			return inferenceData
		} else {
			console.log('Inference failed!');
			console.log(inferenceData); // Print inference data
			throw new Error("Scenario API Failed")
		}
	};

	// Start polling the inference status
	return await pollInferenceStatus();
}
```

再度、上記の関数をReactコードに追加し、`inferenceId` を渡します。レスポンスを受け取ったら、`resObject.inference.images[0].url` で画像のURLを取得できます：

```typescript theme={null}
	...
	if(mint){
		...
	} else {
		const loot = await generate()
		const inferenceId = await getInferenceWithItem(env, loot.loot.name + " " + loot.loot.type)
		const resObject = await getInferenceObjectWithPolling(env, inferenceId)
		console.log(resObject.inference.images[0].url) // prints image url
		...
	}
	...
```

<Note>
  なお、1つのプロンプトで複数の画像を返すアプリケーションを設計し、ユーザーがその中から適切な生成画像を選択できるようにすることも可能です。
</Note>

## 7. Sequence Metadata Service へのメディア保存

Scenario APIから取得したメディアの`url`を使い、次はそのアセットを`Sequence Metadata Service`に保存します。これにより、AI生成画像を特定のトークンメタデータに紐付けることができます。これらはすべてREST-API経由で実現できます。

Dungeon Minterの宝箱報酬はすべて同じプロセスに従い、まずSequence Metadata APIを使ってメタデータを保存し、`url`とランダムに生成された`tokenID`（これにより並列リクエストが可能）がクライアントに返されます。その後、ユーザーがコレクティブルを確認し、ミントに同意した後、`tokenID`とユーザーの`address`が[ステップ5](/guides/treasure-chest-guide#5-deploy-a-cloudflare-worker)で作成したワーカーに返され、ミント処理が行われます。

### 実装方法

[こちらのガイド](/guides/metadata-guide)を完了し、統合して、Cloudflare Workersを活用したSequence Metadata APIベースのサーバーレスメディアサービスを構築してください。または、このガイド用のCloudflare[テンプレート](https://github.com/0xsequence-demos/demo-cloudflare-worker-treasure-chests/)をクローンして利用できます。

完了したら、保存したメディアの`tokenID`と`url`をフロントエンドに渡し、ユーザーがミントする前に内容を確認できるようにします：

```typescript theme={null}
    const randomTokenIDSpace = ethers.parseUnits(String('10000'), 18)
	...
	const jsonCreateAsset = await collectionsService.createAsset({...})
	...
	const response = await uploadAsset(env, projectID, collectionID, jsonCreateAsset.asset.id, String(randomTokenIDSpace), imageUrl)
	return new Response(JSON.stringify({tokenID: String(randomTokenIDSpace), image: response.url }), { status: 200 });
```

## 8. Cloudflare Worker を使ったミント処理

最後のステップは、先ほどメタデータを紐付けた`tokenId`をユーザーのアドレスにミントすることです。ここでは、ステップ5で作成したCloudflare Workerにリクエストを送り、ユーザーにトークンをミントします。

```typescript theme={null}
const data = {
	address: address,
	mint: true,
	tokenID: tokenID
};

const res = await fetch(ENDPOINT, {
	method: 'POST',
	headers: {
	'Content-Type': 'application/json',
	},
	body: JSON.stringify(data),
})

const json = await res.json()
```

重要な注意点として、Cloudflare Workerが特定のフロントエンドからのリクエストのみを処理するようにしたい場合は、`request.headers`の`Referrer`値を`wrangler.toml`の`CLIENT_URL`と比較することで簡単に制御できます。

```typescript theme={null}
async function handleRequest(request: any, env: Env, ctx: ExecutionContext) {
	const originUrl = new URL(request.url);
	const referer = request.headers.get('Referer');

	if(referer.toString() != env.CLIENT_URL){
		return new Response('Bad Origin', { status: 500 }); // Handle errors
	} 

	...
}
```

## まとめ

このチュートリアルで行った内容を振り返りましょう：

**Sequenceプロジェクトの作成方法と、APIスイートへのアクセス方法を解説しました。サンプルのダンジョンクローラーゲーム向けに、スムーズなプレイ体験を提供するための埋め込み型ウォレットの導入・設定も行いました。また、Sequenceプラットフォームを活用してコントラクトをデプロイし、ユーザー体験を簡素化するためにガス代をスポンサーしました。さらに、Sequence Transaction APIを使ったサーバーレスNFTミンターをデプロイし、数百万規模のプレイヤーに対応しつつ、リオーグのような複雑なブロックチェーン処理も可能にしました。加えて、scenario.gg APIを利用して、プレイヤーへの報酬となるゲームアセットを動的に生成しました。これらの画像をSequence Metadata APIでNFTのメタデータに紐付けました。これで、Scenario.ggとSequenceを活用したゲームでAIアートをミントする方法が理解できたはずです。**

スケーラブルで安全、そして**楽しい**ブロックチェーン対応ゲームを作るには多くの要素が必要ですが、SequenceプラットフォームとScenarioがあれば安心です。

最後に、上記すべてのステップを組み込んだ完全な体験を、[ダンジョンクローラーゲーム](https://0xsequence-demos.github.io/demo-dungeon-minter/)で実際に体験できます。迷路に挑戦して、自分だけの戦利品を手に入れましょう。

開発を楽しんでください！

## 9.（オプション）ウォレットごとのネイティブミント制限

特定ウォレットによる宝箱ミントの過剰利用を防ぐため、`wrangler.toml`で`DAILY_MINT_RESTRICTION`というパラメータを設定し、1日あたりの最大ミント数を制限できます。また、必要に応じてプロトコルに`ADMIN`を追加し、無制限にミントできる権限を持たせることも可能です。

これらの機能は、以下の手順でコードに実装できます：

```typescript theme={null}
async function handleRequest(request: any, env: Env, ctx: ExecutionContext) {
	... 
	const payload = await request.json()
	const { address, tokenID }: any = payload

	// check for admin
	if(address.toLowerCase() != env.ADMIN.toLowerCase() && !await hasDailyMintAllowance(env, address)){
		// check for daily mint allowance
		return new Response(JSON.stringify({limitExceeded: true}), { status: 400 })
	}
	...
}
```

`hasDailyMintAllowance`は2つの関数に分かれています：

* ユーザーの`address`のトランザクションを1日分ページネーションで取得する`fullPaginationDay`
* `from`が`0x`アドレスであることに対応する`mintCount`

### インデクサーによる1日分の全ページネーション取得

<Note>
  補足ですが、Sequence Indexerスタックはこの期間中のトランザクションを30日分のみ保持しているため、1日から最大30日まで期間を拡張できます。
</Note>

Sequence Indexerを利用するには、`pnpm install @0xsequence/indexer`が必要です。

実装時は、インデクサーから最初のトランザクションバッチと`page.after`値を取得し、whileループでタイムスタンプが24時間未満かどうかを継続的にチェックしながら、一時配列に追加していきます。これにより、利用可能なすべてのトランザクションを取得できます：

```typescript theme={null}
import { SequenceIndexer } from '@0xsequence/indexer'

const isLessThan24Hours = (isoDate: string) => {
    const dateProvided: any = new Date(isoDate);
    const currentDate: any = new Date();
    const twentyFourHours = 24 * 60 * 60 * 1000; // 24 hours in milliseconds

    // Calculate the difference in milliseconds
    const difference = currentDate - dateProvided;

    // Check if the difference is less than 24 hours
    return difference < twentyFourHours && difference > 0;
}

const fullPaginationDay = async (env: Env, address: string) => {
    const txs: any = []
	const indexer = new SequenceIndexer(`https://${env.CHAIN_HANDLE}-indexer.sequence.app`, env.PROJECT_ACCESS_KEY)

    const filter = {
        accountAddress: address,
    };

    // query Sequence Indexer for all token transaction history
	let txHistory: any
	let firstLoop = true;
    let finished = true;
    // if there are more transactions to log, proceed to paginate
    while(firstLoop || (!finished && txHistory.page.more)){  
		if(firstLoop){
			firstLoop = false
			txHistory = await indexer.getTransactionHistory({
				filter: filter,
				page: { pageSize: 50 }
			})

			for(let i = 0; i < txHistory.transactions.length; i++){
				if(!isLessThan24Hours(txHistory.transactions[i].timestamp)){
					finished = true
				}
				txs.push(txHistory.transactions[i])
			}
		}
        txHistory = await indexer.getTransactionHistory({
            filter: filter,
            page: { 
                pageSize: 50, 
                // use the after cursor from the previous indexer call
                after: txHistory!.page!.after! 
            }
        })
		for(let i = 0; i < txHistory.transactions.length; i++){
			if(!isLessThan24Hours(txHistory.transactions[i].timestamp)){
				finished = true
			}
			txs.push(txHistory.transactions[i])
		}
    }

    return txs
}
```

### 1日分のミント数取得

`ERC721`および`ERC1155`標準のSequenceコントラクトからミントされたすべてのコレクティブルは、`from`が`0x`アドレスとなります：

```typescript theme={null}
const mintCount = (env: Env, txs: any) => {
	let count = 0
	for(let i = 0; i < txs.length; i++){
		if(
			txs[i].transfers[0].from == '0x0000000000000000000000000000000000000000' 
			&& txs[i].transfers[0].contractAddress == env.CONTRACT_ADDRESS.toLowerCase()
		) count++
	}
	return count
}
```

### 1日あたりのミント許可の有無

```typescript theme={null}
const hasDailyMintAllowance = async (env: Env, address: string) => {
	const txs = await fullPaginationDay(env, address)
	const count = mintCount(env, txs)
	return count < env.DAILY_MINT_RESTRICTION
}
```
