

Lootbox with AI Minting
Time to complete: 50-60 minutes
In this guide we will go through the process of integrating a static html/js maze into a web3 enabled react app, leveraging tools from the Sequence Stack to mint AI generated loot from lootboxes.
The tools will enable you to perform:
- Sequence Builder Console Signup & Project Creation: Create a project with the Builder
- Access Key Management: Claim an public & secret access key to interact with the Sequence stack
- Sequence Kit Integration: Integrate Sequence kit into the application
- iframe-to-Dapp Communication: Send iframe messages from a seperately deployed frontend to a react app
- Deploy a Contract & Sponsor gas: Deploy an items contract and sponsor gas
- Deploy a Cloudflare Worker: Deploy a cloudflare worker for gasless and no-confirmation transactions
- Generating AI Prompts & Images: Craft AI prompts from an API and generate images to be uploaded
- Store Media to Sequence Metadata service: Upload collection and token metadata to Sequence
- Securing Your Cloudflare Worker: Prevent outside requests to your cloudflare worker by restricting the referrer
- (Optional) Naive Mint Restriction Per Wallet: Restrict daily mints per wallet
1. Sequence Builder Console Signup & Project Creation
First start by following this walk-through for how to sign up to the Sequence Builder Console and to learn how to create a project.
In order to use certain features, like Gas Sponsoring and the use of the Sequence Relayer, you'll need to upgrade your project plan to Developer using this walk-through
2. Access Key Management
Now that you have a project, you'll need to acquire 2 different Access Keys for your project.
- Public Access Key used for the wallet & transactions API, which can be done here
- Secret Access Key used for the Metadata Service, which can be done with the following instructions:
First start by accessing settings, and selecting the API Keys
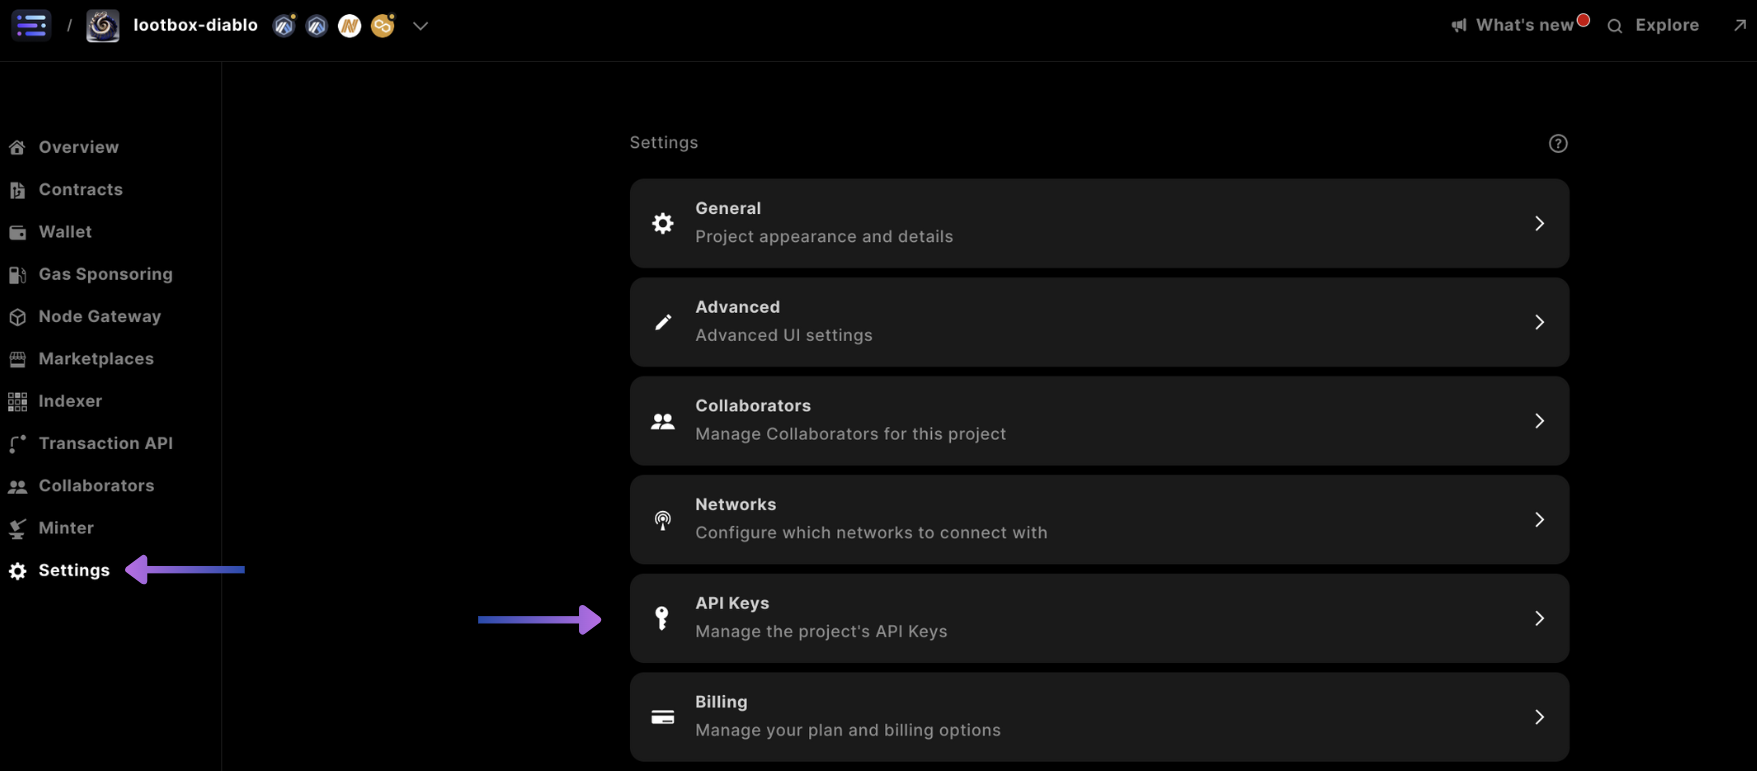
Scroll down and select + Add Service Account
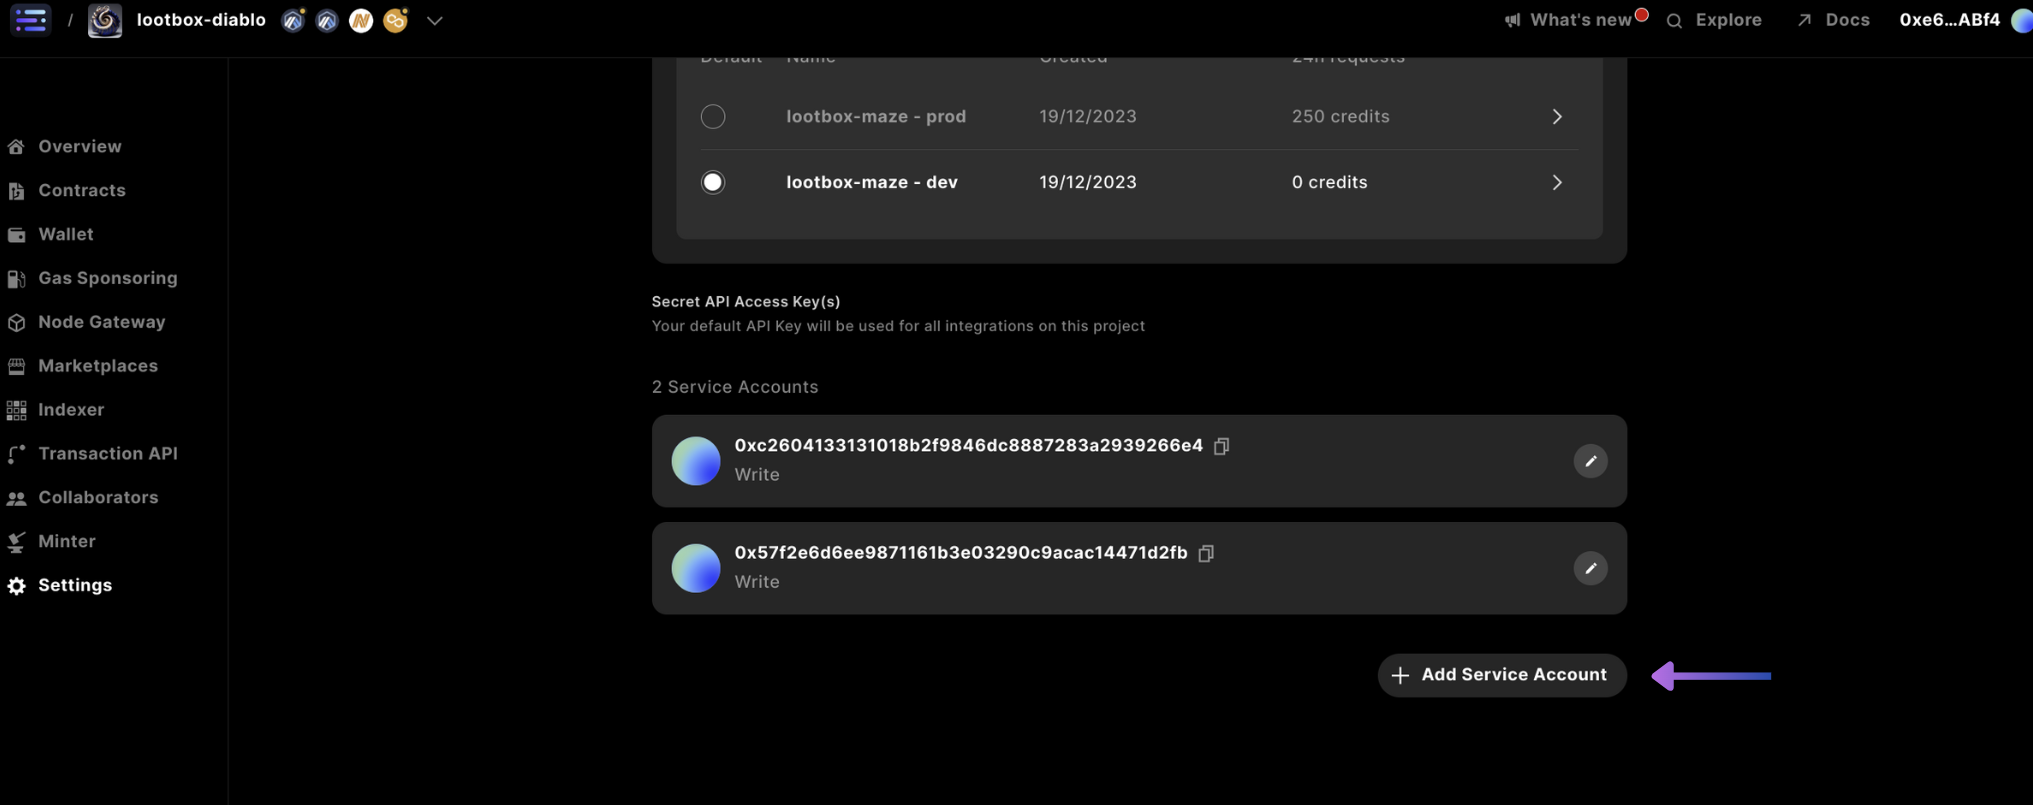
Then change the access to write and confirm

Finally copy the key and store it in a safe location, as you will not have access to this in the future from the Builder Console.
3. Sequence Kit Integration
We'll start from scratch building up the project with the necessary peices.
First start by creating a project folder with mkdir <project>, then cd <project> and create a vite project using:
pnpm create vite

# or
yarn create vite

# or
npm create vite
Next, we'll install the correct packages to use Sequence Kit.
npm install @0xsequence/kit @0xsequence/kit-wallet @0xsequence/kit-connectors wagmi [email protected] viem 0xsequence @tanstack/react-query @0xsequence/design-system
# or
pnpm install @0xsequence/kit @0xsequence/kit-wallet @0xsequence/kit-connectors wagmi [email protected] viem 0xsequence @tanstack/react-query @0xsequence/design-system
# or
yarn add @0xsequence/kit @0xsequence/kit-wallet @0xsequence/kit-connectors wagmi [email protected] viem 0xsequence @tanstack/react-query @0xsequence/design-system
In the /src folder you'll find a main.tsx, in there update the code to be the following, that incorporates the Sequence Kit connector and @0xsequence/design-system ThemeProvider
This code uses arbitrum-sepolia as the network, as well as the following options to login: email, google, & apple.
import React from 'react'
import ReactDOM from 'react-dom/client'
import App from './App.tsx'

import { KitProvider } from '@0xsequence/kit'
import { getDefaultConnectors } from '@0xsequence/kit-connectors'
import { KitWalletProvider } from '@0xsequence/kit-wallet'

import { createConfig, WagmiConfig} from 'wagmi'
import { QueryClient, QueryClientProvider } from '@tanstack/react-query'
import { arbitrumSepolia} from 'wagmi/chains'

const PROJECT_ACCESS_KEY = import.meta.env.VITE_PROJECT_ACCESS_KEY!
const WALLET_CONNECT_ID = import.meta.env.VITE_WALLET_CONNECT_ID!

const queryClient = new QueryClient()

function Dapp() {
	const chains = [arbitrumSepolia] as any

	const projectAccessKey = PROJECT_ACCESS_KEY

	const connectors = getDefaultConnectors({
		walletConnectProjectId: WALLET_CONNECT_ID,
		defaultChainId: 421614,
		//@ts-ignore
		appName: 'Dungeon Crawler Lootbox Demo app',
		projectAccessKey
	  })

	  const transports: any = {}

	  const config = createConfig({
		// @ts-ignore
		transports,
		connectors,
		chains
	  })
  	const kitConfig: any = {
		projectAccessKey: PROJECT_ACCESS_KEY,
		position: 'center',
		defaultTheme: 'dark',
		displayedAssets: [
			{
				contractAddress: '0xaf8a08bf8b2945c2779ae507dade15985ea11fbc', // or include your contract address here
				chainId: 421614
			}
		],
		signIn: {
			projectName: 'Demo Dungeon Crawler Lootbox',
			showEmailInput: true,
			socialAuthOptions: ['google', 'apple'],
			walletAuthOptions: ['wallet-connect']
		}
	}

  return (
	<WagmiConfig config={config}>
		<QueryClientProvider client={queryClient}>
			<KitProvider config={kitConfig}>
				<KitWalletProvider>
					<App />
				</KitWalletProvider>
			</KitProvider>
	  	</QueryClientProvider>
    </WagmiConfig>
  );
}

ReactDOM.createRoot(document.getElementById('root')!).render(
	<React.StrictMode>
		<Dapp />
	</React.StrictMode>,
)
Once your main.tsx is ready, lets create a login button
In App.tsx use the following code that checks to see if a user is connected, and makes 2 different screens appear given this information.
import {useEffect} from 'react'

import { useOpenConnectModal } from '@0xsequence/kit'
import { useDisconnect, useAccount } from 'wagmi'
import { useOpenWalletModal } from '@0xsequence/kit-wallet'

function App() {

    const { setOpenConnectModal } = useOpenConnectModal()
    const { setOpenWalletModal } = useOpenWalletModal()
    const { isConnected, address } = useAccount() // address can be used to mint
    const { disconnect } = useDisconnect()

	useEffect(() => {

  }, [isConnected])

  return (
    <>
      {
      isConnected ?
        <>
          <button onClick={() => setOpenWalletModal(true)}>open wallet</button>
          <button onClick={() => disconnect()}>disconnect</button>
        </>
      :
        <>
          <button onClick={() => setOpenConnectModal(true)}>connect</button>
        </>
      }
    </>
  )
}

export default App
Then, include a .env file in the root of your project, adding it to .gitignore, then updating the file with the following values
VITE_PROJECT_ACCESS_KEY=
VITE_WALLET_CONNECT_ID=
VITE_TRUSTED_IFRAME_ORIGIN=https://localhost:8002Run your code with the following command in the root folder and give it a try
pnpm run dev4. iframe-to-Dapp Communication
The way the application is setup, a react app communicates to another frontend app process, so that integration between software environments can be made possible.
This learning can be useful for building any iframe cross application design.
With iframes, there's a native feature that allows you to pass messages between url and integrated frames.
In order to accomplish this one must setup a producer message from the included child app, and a consumer recieving handler, with a restricted origin to prevent others from loading malicious iframes into your application.
Begin by cloning down this repository and running it with installing the packages pnpm install and running with node server.js to listen on http:localhost:8002
iframe Producer Message From Child Window
With a single line of code contained within a click handler, one can send a message to the parent window, with a describing message that can pass any JSON object to the hoisting scope
function onMouseClick(event){
	...
	// if clicked event intersects a lootbox
	window.parent.postMessage({portal: 'loot'}, 'http://localhost:5173/demo-lootbox/');
}
Dapp Consumer Handler In Parent Window
Next we create a message event listener where the window.addEventListener('message', callback) is a method used in web development to listen for message events. It allows different browsing contexts, such as iframes, pop-up windows, or other tabs within the same browser, to communicate securely.
const iframeToAppChannel = (event: any) => {
	const trustedOrigin = import.meta.env.VITE_TRUSTED_IFRAME_ORIGIN // You would change this to your production deployment

	if (event.origin !== trustedOrigin) {
		// Security check: Ensure that the message is from a trusted source.
		return;
	}

	if(event.data.portal == 'loot' && isConnected){
		// generate loot for the user
		generate()
	}
}

window.addEventListener('message', iframeToAppChannel);
Now if you were to trigger the click handler in the included iframe, the parent react app would recieve it for further processing, like with any connected wallet.
5. Deploy A Contract & Sponsor Gas
When deploying your contract, the recommended approach is to use an ERC1155 over an ERC721. The benefits of using an ERC1155
- random spaced
tokenIDto allow for parallelized minting - option via consent to apply governance to mint additional tokens of the same
tokenID
However, if you plan to only ever mint a single token of the generated media and you prefer technical security in managing parrallized minting over managing the security of the transactions API private key (which can always be rotated by setting a new collectible role via the Sequence Builder) an ERC721 might be better suited.
To deploy a contract, you can follow this guide to deploy your ERC1155, and update your wrangler.toml with the CONTRACT_ADDRESS
And to sponsor gas, follow this guide
6. Deploy A Cloudflare Worker
Minting A Token
If you want to learn how to deploy a Cloudflare Worker from scratch, you can follow this default guide on minting a serverless gasless minter with your deployed ERC1155 contract
Add Lootbox Object Composition
Next, ensure that you can mint a token by making a request to the cloudflare API. Then, add the additional object composition design to include the lootbox specific functions, where the prior cloudflare worker can be integrated into this template template lootbox cloudflare worker.
And as seen in the completed lootbox code, the callContract is would need to be integrated into the template
In this codebase (which has optional design), we use a style of javascript to assemble javascript object in a functional manner which can be seen here
Where in the following sections, we will complete the functions:
ProcessInferencePool: used to source loot metadata seed values from an external apiInference: used to generate AI imagery and to check the status an in-progress inferenceUpload: used to store metadata for future retrieval
let lootbox = ProcessInferencePool(
				Inference(
					Time(
						Strings(
							Upload(
								{
									env: env
								}
							)
						)
					)
				)
			)
Using this design, we give appreciation to the following wizard and staff meme, to align with ones values and inherently transfer value of knowing who you are into your collection:

7. Generating AI Prompts & Images
In the template, we've included code to call an already deployed API and code to parse the response that is free to call yourself
With this API, we will showcase how to generate images from Scenario.gg by passing in a prompt.
This can be accomplished by completing the getInferenceWithItem function and passing in a prompt which is basically the generated loot name and type, as well as some additional parameters
...
	getInferenceWithItem: async (prompt: any) => {
		return new Promise( async (res) => {
			fetch(`https://api.cloud.scenario.com/v1/models/${base.env.SCENARIO_MODEL_ID}/inferences`, {
				method: 'POST',
				headers: {
					'Authorization': `Basic ${base.env.SCENARIO_API_KEY}`,
					'accept': 'application/json',
					'content-type': 'application/json'
				},
				body: JSON.stringify({
							"parameters": {
							"numSamples": 1,
							"qualityBoostScale": 4,
							"qualityBoost": false,
							"type": "txt2img",
							"disableMerging": false,
							"hideResults": false,
							"referenceAdain": false,
							"intermediateImages": false,
							"scheduler": 'EulerDiscreteScheduler',
							"referenceAttn": false,
							"prompt": prompt + ' single object on black background no people' // update this to your choosing
						}
					})
			})
			.then(response => response.json())
			.then((data: any) => {
				res({inferenceId: data.inference.id})
			})
			.catch(error => console.error('Error:', error));
		})
	}
...
and calling the method like so to return an inferenceId
	...
	if(mint){
		...
	} else {
		const loot = await lootbox.generate()
		const inferenceId = await lootbox.getInferenceWithItem(loot.loot.name + " " + loot.loot.type)
		...
	}
	...
Once we have the inferenceId we can call poll the inference status
const pollInferenceStatus = async (res: any) => {
	let status = '';
	let inferenceData: any = null;

	// checking if the status is succeeded or failed
	while (!['succeeded', 'failed'].includes(status)) {
		// Fetch the inference details
		try {
			const inferenceResponse = await fetch(`https://api.cloud.scenario.com/v1/models/Fm1gtd_gRwmopwj2gyWtUA/inferences/${inferenceId}`, {
				method: 'GET',
				headers
			});
			if (inferenceResponse.ok) {
				console.log(inferenceResponse.statusText)
				inferenceData = await inferenceResponse.json();

			}
		}catch(err){
			console.log(err)
		}
		status = inferenceData.inference.status;
		console.log(`Inference status: ${status}`);

		// Wait for a certain interval before polling again
		await new Promise(resolve => setTimeout(resolve, 5000)); // Polling every 5 seconds
	}
	// Handle the final status
	if (status === 'succeeded') {
		console.log('Inference succeeded!');
		console.log(inferenceData); // Print inference data
		res(inferenceData)
	} else {
		console.log('Inference failed!');
		console.log(inferenceData); // Print inference data
		throw new Error("Scenario API Failed")
	}
};
and call the getInferenceStatus with the inferenceId passed in, where when you receive the response, you can obtain the image url with resObject.inference.images[0].url
	...
	if(mint){
		...
	} else {
		const loot = await lootbox.generate()
		const inferenceId = await lootbox.getInferenceWithItem(loot.loot.name + " " + loot.loot.type)
		const resObject = await lootbox.getInferenceStatus(inferenceId)
		console.log(resObject.inference.images[0].url) // prints url
		...
	}
	...
8. Store Media to Sequence Metadata Service
With our media url in hand, we can move onto storing the asset to the Sequence Metadata Service
Complete and integrate this guide in order to build a Serverless Media Service that uses Cloudflare Workers
Then once complete, pass the stored media url to the frontend
	...
	const response = await someStoreFunction(...)
	return new Response(JSON.stringify({... image: response.url, tokenID: response.tokenID}), { status: 200 });
9. Securing Your Cloudflare Worker
In order to secure your cloudflare worker to only process requests from a certain frontend origin, you can simple check the request.headers for the Referrer value and compare against the CLIENT_URL in the wrangler.toml
async function handleRequest(request: any, env: Env, ctx: ExecutionContext) {
	const originUrl = new URL(request.url);
	const referer = request.headers.get('Referer');

	if(referer.toString() == env.CLIENT_URL){
		...
	} else {
		return new Response('Bad Origin', { status: 500 }); // Handle errors
	}
}
10. (Optional) Naive mint restriction per wallet
As an option to prevent overuse of the lootbox minting from specific wallets, a parameter called DAILY_MINT_RESTRICTION can be set in the wrangler.toml as a maximum mint allowance per day. And, if you feel it's necessary adding an ADMIN to your protocol, to be able to in the future mint to a marketplace, this can be included too.
These features can be implemented in the code with the following steps:
async function handleRequest(request: any, env: Env, ctx: ExecutionContext) {
	...
	const payload = await request.json()
	const { address, tokenID }: any = payload

	// check for admin
	if(address.toLowerCase() != env.ADMIN.toLowerCase()){
		// check for daily mint allowance
		if(!await hasDailyMintAllowance(env, address)){
			return new Response(JSON.stringify({limitExceeded: true}), { status: 400 })
		}
	}
	...
}
Where hasDailyMintAllowance is broken down into 2 functions:
fullPaginationDayof transactions of the usersaddressmintCountthat corresponds to thefrombeing the0xaddress
Full Pagination Of Indexer For A Day
In order to use the Sequence Indexer, we'll need to pnpm install @0xsequence/indexer
Then, to implement we use a while loop that gets the first batch of transactions and the page.after value from the indexer, and continously checks if the timestamp is less than 24 hours appending to a temporary array for each pass. This ensures we get all of the available transactions.
import { SequenceIndexer } from '@0xsequence/indexer'

const isLessThan24Hours = (isoDate: string) => {
    const dateProvided: any = new Date(isoDate);
    const currentDate: any = new Date();
    const twentyFourHours = 24 * 60 * 60 * 1000; // 24 hours in milliseconds

    // Calculate the difference in milliseconds
    const difference = currentDate - dateProvided;

    // Check if the difference is less than 24 hours
    return difference < twentyFourHours && difference > 0;
}

const fullPaginationDay = async (env: Env, address: string) => {
    const txs: any = []
	const indexer = new SequenceIndexer(`https://{env.CHAIN_HANDLE}-indexer.sequence.app`, env.PROJECT_ACCESS_KEY)

    const filter = {
        accountAddress: address,
    };

    // query Sequence Indexer for all token transaction history
	let txHistory: any
	let firstLoop = true;
    let finished = true;
    // if there are more transactions to log, proceed to paginate
    while(firstLoop || (!finished && txHistory.page.more)){
		if(firstLoop){
			firstLoop = false
			txHistory = await indexer.getTransactionHistory({
				filter: filter,
				page: { pageSize: 50 }
			})

			for(let i = 0; i < txHistory.transactions.length; i++){
				if(!isLessThan24Hours(txHistory.transactions[i].timestamp)){
					finished = true
				}
				txs.push(txHistory.transactions[i])
			}
		}
        txHistory = await indexer.getTransactionHistory({
            filter: filter,
            page: {
                pageSize: 50,
                // use the after cursor from the previous indexer call
                after: txHistory!.page!.after!
            }
        })
		for(let i = 0; i < txHistory.transactions.length; i++){
			if(!isLessThan24Hours(txHistory.transactions[i].timestamp)){
				finished = true
			}
			txs.push(txHistory.transactions[i])
		}
    }

    return txs
}
Mint Count For A Day
All collectibles minted from the ERC721 and ERC1155 standard Sequence contracts are from the 0x address
const mintCount = (env: Env, txs: any) => {
	let count = 0
	for(let i = 0; i < txs.length; i++){
		if(
			txs[i].transfers[0].from == '0x0000000000000000000000000000000000000000'
			&& txs[i].transfers[0].contractAddress == env.CONTRACT_ADDRESS.toLowerCase()
		) count++
	}
	return count
}
Has Daily Mint Allowance
const hasDailyMintAllowance = async (env: Env, address: string) => {
	const txs = await fullPaginationDay(env, address)
	const count = mintCount(env, txs)
	return count < env.DAILY_MINT_RESTRICTION
}