- Create a Builder Project & Obtain an Access Key
- Initialize React Vite Application
- Use Sequence Wallet for User Sign in
- Use EIP712 Typed Data to Generate EIP6492 Signatures
- Deploy Contract for EIP712 Verification and EIP1271 Validation
- Render Response from Verifying & Validating Contract
See the full code for the demo for more information and an example demo can be found here.
1. Create a Builder Project & Obtain an Access Key
First, follow this guide to create a project in the Sequence Builder and obtain a project access key.2. Initialize React Vite Application
Next, begin by initializing a new project that will hold all the code neccessary to generate signatures and validation responses from the blockchain:3. Use Sequence Wallet for User Sign in
Install the necessary packages required for the project to function:4. Use EIP712 Typed Data to Generate EIP6492 Signatures
Next, we’ll define a custom typed data in typescript and using the utilities library from Sequence constructing aTypedData type, where we will be verifying a message structure with name, wallet, and message parameters:
In this example VERIFYING_CONTRACT_ADDRESS is the smart contract we deployed on sepolia but we will show you in the next step what this contract does so you can deploy yourself any any network:
5. Deploy Contract for EIP712 Verification and EIP1271 Validation
We will now provide source code that you can use in something like Remix to deploy a contract, or even something like Foundry for building and deploying with the Sequence Builder1
Universal Signature Validator
The Universal Signature Validator can hypothetically be deployed once for a specific network, and shared with many applications, making it composable and reusable. It’s use is for both off-chain and on-chain smart contract wallets for EIP6492 enabled wallets.You can find the source code here that you can use to deploy.
2
Custom Contract Verifier
The next contract we’ll explain more in-depth with the various functions, as this contract can be customized for the specific application. Begin with the following basics with the Universal Signature Validator passed in the constructor in the first step:
3
Verify Signature
Next, we have the verify signature function which both: creates the message hash digest and validates the signer:
Custom Person Digest
In the following function we recreate the struct hash with the passed in parameters, which can be extended to include more or less parameters with varying types:For more information on constructing the digest, see the EIP712 specification.Validate Signer
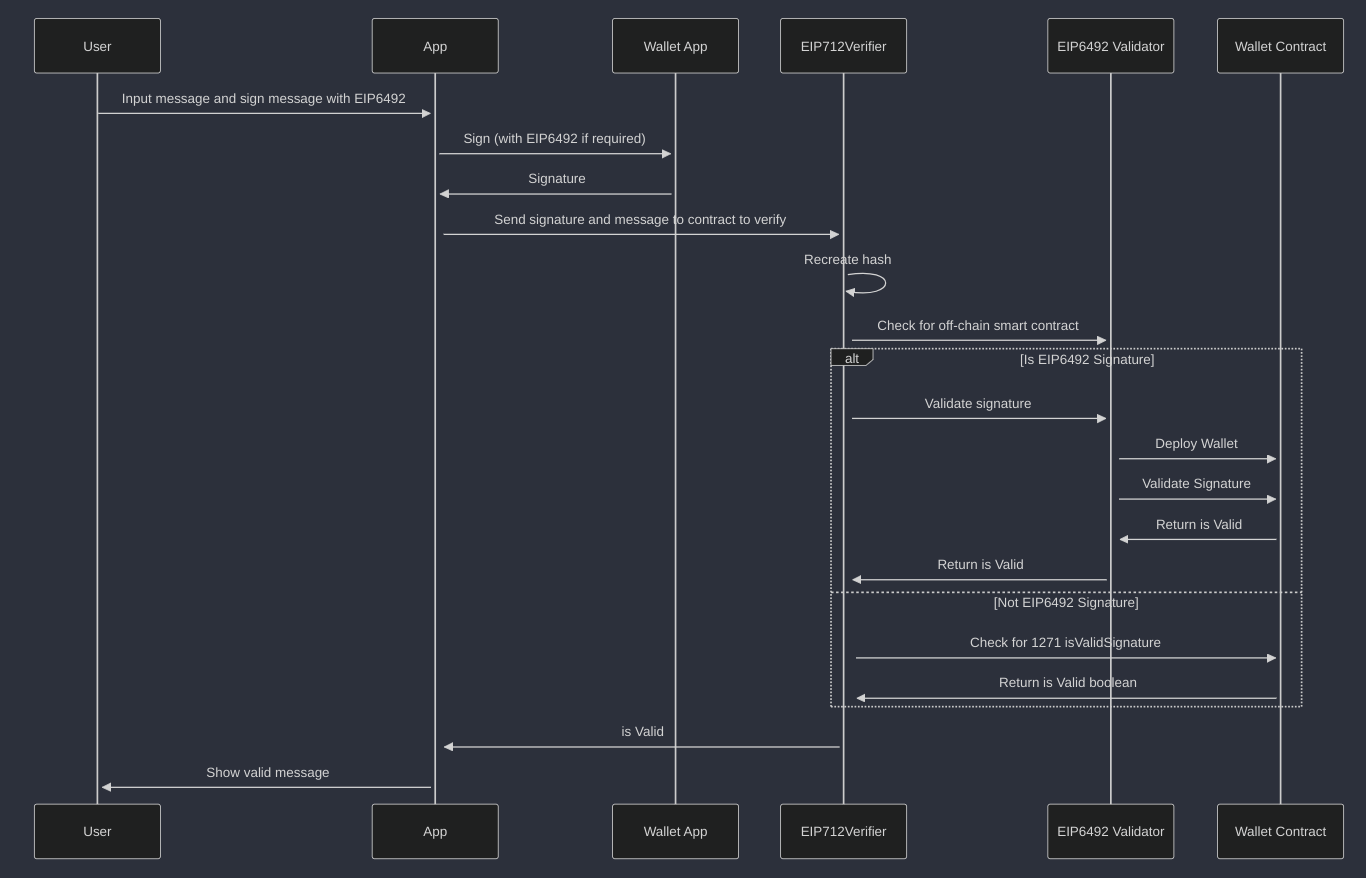
Next, we validate thesigner address, the digest and signature. If an EIP6492 signature has been supplied we use the universal signature validator, otherwise we check the EIP1271 signature validation directly:6. Render Response from Verifying & Validating Contract
We pass the signatures and call the contract deployed usingethers with the passed in PROJECT_ACCESS_KEY in the following steps:
1
Create a Provider
Create a provider using the project access key:
2
Initialize an Ethers Contract
Import the ABI that was generated from step 5 (or copy from the git source code), include the provider, and input the verifying contract address:
3
Static Call the Verify Signature Function
By performing a static call on the function, we simulate the transaction without submitting it on chain. This returns a result specifying if the validation was true or false: